Monday, December 2, 2013

Perfect Pie Crust


Oh, pie dough! Is there anything so simple and so widely loved that also strikes fear in the heart of those who dare attempt to tame it? It can break apart before you even do anything with it. It can be too tough. It mocks you openly. And yet you desire it just the same. How can we tame this wild beast of the kitchen? With a few extra steps that are actually totally easy, you can achieve a pie crust fit for the gods. The trick to making pie dough work for you is to keep all of the ingredients cold, as in, ALL of them! Even your flour goes in the freezer.

There are a few heated debates in the world of pie, one of them being which source of fat to use in order to moisten and flake-ify your crusts. Some grannies refuse to use anything but shortening, others say butter is the answer, a few crazies say it's possible with oil, and some swear by chilled lard. If you're a vegan, your obvious choice is vegetable shortening. Shortening can do the job if it's kept chilled throughout the dough-making process, and it can lend a good texture to your crust, but it's messy, sticky, and not that fun to work with. And you're not going to win any flavor contests with it. I've tried crusts with different fats, and lard is good if you're living in the Little House on the Prairie and you want to use everything and not waste anything, that's a good old school method and certainly acceptable. But for the absolute best flavor with flaky results, the obvious choice is butter! A lot of pie crust recipes will tell you to pulse the butter and flour in a food processor, but this is a serious error. The flour gets overworked and tough and the flakiness is sacrificed. Using your fingertips or a pastry cutter to blend the butter and flour takes under 5 minutes, and the result will be a more tender crust. Besides, cleaning the food processor is a pain. Go old school with pie crust.


(Makes 2 pie crusts)


3 cups unbleached all-purpose flour
1 cup (2 sticks) chilled butter
1 1/2 teaspoons salt
1 teaspoon vinegar
1/2 - 3/4 cup ice water


Measure out your salt and flour, combine in a large bowl, and put into the freezer, at least 15 minutes. Meanwhile, cut your butter into small chunks and place them in a bowl, then refrigerate. 


Place ice into a liquid measuring cup, then fill with water and stir around. Add the vinegar to the water, then put the water into the refrigerator. Sprinkle a good amount of flour on a large work surface, then grab your chilled flour and butter from the freezer and fridge. Using your fingertips or a pastry cutter, crush the butter cubes into the flour, rubbing between your hands or fingertips and continually making the chunks of butter smaller, until the mixture resembles pea-sized crumbs. Don't worry about uniformity; you don't want the chunks of butter to completely disappear. 


Next, take out your ice water from the fridge and remove the ice cubes. Begin, a few tablespoons at a time, adding water to your butter crumb mixture, and stir with a wooden spoon. Continue adding maybe around 8 tablespoons of water, until all of the crumbs come together and stick in one large dough ball that comes away from the sides of the bowl. 


At this point, the dough may still be a little moist, but that's okay because more flour will get into it after the next step. Dump your dough onto your floured work surface, and with floured hands, press the dough together and fold it 4 or 5 times, occasionally sprinkling a little flour on top, until the dough is a nice happy lump. 


Ideally, you should see big visible chunks of butter in the dough. When the heat hits the cold butter in the dough, the butter will start to melt and steam will cause layers to puff up in your crust. That puffing and layering action during cooking will also result in a golden brown crust that is a little thicker than it was when you rolled it out. So if you see little chunks of butter when you roll out your crust, you should feel good about it. Cut your dough in half and wrap each half in saran wrap, flattening into a disk, then refrigerate at least 30 minutes before you want to roll it out. This will give the dough a chance to rest and get chilly again. 

(After chilling, ready to roll out.)

This recipe will give you one top and one bottom crust, or two bottom crusts... you get the picture. When you're ready to roll your dough, always be sure to roll your crusts from the middle out, only rolling from the center to the edges, never rolling back and forth. This will keep the pie dough from shrinking back on the pie plate when you bake it. 


Now, find your favorite pie recipes and go have a little fun making a beautiful pie crust! Your friends and family will love it before they take their first heavenly bite.


Sunday, December 1, 2013

Buttermilk Corn Bread


Cornbread, when done right, is one of the simplest pleasures in life. A great cornbread is everything a comfort food should be. Moist, tender, dense, buttery and sweet. There are few bigger disappointments in life than encountering a dry, crumbly cornbread. It's a travesty. Some people prefer a savory cornbread with cheese and jalapeños, but my style is more sweet with butter and honey (or even better, honey butter). I made it tonight with some fantastic slow-cooked chili and the two paired up beautifully together. If you want an incredibly moist and delicious cornbread with cheese and peppers, cut the sugar for this recipe in half. Now if you're ready, buckle up and follow me for the best melt-in-your-mouth cornbread in the world!


Ingredients:

1 cup yellow cornmeal 
1 cup unbleached all-purpose flour 
3/4 cup powdered sugar 
1/2 teaspoon salt
1/2 teaspoon baking powder 
1/2 teaspoon baking soda 
2 large eggs 
1 cup buttermilk 
⅔ cup or about 1/2 can creamed corn 
6 tablespoons salted butter, melted, divided


Preheat oven to 350 F or 177 C. 

Combine the cornmeal, flour, sugar, salt, baking powder, and baking soda in a large bowl.


Pour 1 cup of buttermilk into a liquid measuring cup, add the eggs and beat with a fork. Add the buttermilk liquid to the dry ingredients and mix. 


Next, add your creamed corn and mix until combined, being careful not to mix too much.


Pour 4 tablespoons melted butter into the batter and barely mix, leaving visible streaks of melted butter. Pour into a greased 8 or 9 inch cake pan, square pyrex pan, or cast iron skillet.


Drizzle the remaining melted butter over the top of the batter and do not mix.


Bake in a 350 degree oven about 40 to 45 minutes if using a cake pan or square pan, or 50 minutes if using a cast iron skillet. The cornbread should be golden brown on the edges and a knife inserted in the center should come out clean. Let stand 15 minutes before slicing, then serve with honey butter.

Serves 6-8


Friday, November 29, 2013

Bacon Confetti Creamed Corn


About a month ago, my dad celebrated his birthday by going to Lawry's in Beverly Hills for old-school prime rib and other fixings, and he mentioned that he really enjoyed their creamed corn. Cruising the internet for Thanksgiving recipe ideas, I came across a recipe for creamed corn with peppers, onions, and bacon, and I KNEW I had to make it for my dad! I messed with the recipe a little bit to make it even more flavorful, and the result was the most beautiful creamed corn, which ended up being everyone's favorite dish on Thanksgiving! It's like Xzibit showed up and pimped my creamed corn. If you have a little time, you HAVE to make this. If you can, make the creamed corn without the bacon the day before, and let it sit in the fridge to let the flavors meld, then warm it up the next day and add the crispy bacon on top. Vegetarians can skip the bacon and still be happy. I made the creamed corn the day before to save time on Thanksgiving, and the fact that it sat in the fridge overnight just helped make it even better. The best thing about this recipe might be that every ingredient is available year-round, and it would probably be just as great at a barbecue as it is on Thanksgiving. And with Christmas just around the corner, this creamed corn with red and green peppers would make a great Christmas dinner side. I will definitely be making this again soon, and I hope you try it!


Ingredients:

8 ears of yellow corn
1/3 cup chopped anaheim pepper
1/3 cup chopped red bell pepper
1 jalapeño pepper, chopped
1 sweet onion
8 slices of bacon
1 8oz package of cream cheese
1/2 cup half and half or cream
2 tablespoons butter
1 teaspoon salt
1/2 teaspoon pepper
1 tablespoon sugar


Remove the husks and corn silk from the corn cobs. Using a sharp knife, shave the corn from the cob as close to the core as you can. Fair warning: corn is not always cooperative! Some corn kernels have a mind of their own and will jump out all over the counter, floor, and into your face. Keep your broom close by. The first cut into the corn cob is a little harder, but the rest of them go smoother if you shave half-inch sections off at a time. 


After you've got your corn kernels, chop the peppers, removing the seeds and white flesh. I suppose the jalapeño is optional, but it adds a really good smoky flavor, and with the seeds removed it isn't really spicy. Next, chop the onion so that the pieces are the same size as the peppers. In a large pot, melt 2 tablespoons of butter and add the onions and peppers.


Add a light dusting of salt and sautee for 2 minutes, then add the corn. You may need to sautee everything in two large pots or pans because there's so much corn that all of it might not touch the surface of one pan. I started out in one pot and ended up cooking half of it in another large pan. 


While your veggies are cooking, cook your bacon until it's dry and crispy, then drain and pat dry. After about 10 minutes, when the onions and peppers are tender, cut your cream cheese into chunks and add all of it to the corn. Stir the corn and melt the cream cheese down, adding your half and half. 


When the cream cheese has melted, add 1 tablespoon of sugar, 1 teaspoon of salt, and 1/2 teaspoon of pepper. Be sure to taste it to make sure the salt and sugar are right. Lastly, chop up your precious, precious bacon. Put your creamed corn into a serving dish and top it with the chopped bacon, then see if you can stop yourself from eating the entire thing in one sitting. You probably can't, but your attempt at self-control is noble.

Serves 6-8


Sunday, November 24, 2013

Buttermilk Biscuits


Ah, the fluffy, flaky, delicious-with-butter-and-honey (or sausage and gravy), American buttermilk biscuit. Buttermilk biscuits are not the same biscuits as in the UK and Australia, which distinguish small butter cookies as "biscuits," and big, chunky chocolate chip cookies as "cookies." In America, they're all cookies.

To us, a biscuit means one thing and one thing only: A hot roll that borders on scone territory, tangy with buttermilk, savory with lots of butter, light, fluffy, airy, flaky, and tender. They can be eaten with butter and honey or jam, or sometimes a honey butter or maple butter compound. Some people like to use them for crispy chicken sandwiches (oh god I'm drooling) or for biscuits and gravy, in which biscuits are topped with a peppery white sausage gravy (more drool). Whatever you decide to do with your biscuits, first you're going to need to start with a plain, perfect biscuit. And that's where I come in to help!

For decent biscuits, yeah, you could just use plain all-purpose flour. But you don't want decent, you want perfection! And for that, you're going to have to use a mix of cake flour and plain flour. Why cake flour? The cake flour will give your biscuits a light, airy tenderness that simply can't be achieved with using only dense, glutenous all-purpose flour. The regular flour helps with the integrity of the dough, but the cake flour balances things out so you don't end up with tough biscuits.

Another crucial step to achieving perfect biscuits (as well as pie crusts) is to keep all of your ingredients COLD. Cold as ice. You're willing to sacrifice our love! Sorry, Foreigner moment. Yes, cold, as in your flour goes in the freezer. And when you cut your butter into small cubes, stick it back in the fridge for a few minutes to counteract the exposure to room-temperature air. Taking these extra steps means that when the heat of the oven hits the chunks of butter in your cold dough, little pockets of steam will puff up and create the perfect flaky layers that define a good biscuit (or pie crust). If you allow your ingredients to get warm, your biscuits will not get fluffy layers, and you will cry. This is the same reason why the cold biscuits go directly into a very hot oven and not just a warm oven - we don't want the dough to sit around warming up, it has to hit the heat and bake up right away.

If you're outside the US and want to try these, check out my post about converting US cooking measurements.

Now that you know the what, why and how, let's get started on hands-down, THE BEST buttermilk biscuits!Yay!

Ingredients:

1 1/4 cup cake flour
3/4 cup all-purpose flour, plus extra for rolling and cutting
1 1/2 teaspoon baking powder
1/2 teaspoon baking soda
1/2 teaspoon salt
1/4 cup butter, cut into small chunks
1 cup buttermilk


Preheat oven to 500F or 260C. Prepare your ingredients for chilling. In a medium-large bowl, whisk together your dry ingredients: cake flour, all-purpose flour, baking powder, baking soda, and salt. Put this dry mixture into the freezer to chill. Next, cut the butter into small chunks, then put the chunks in a small bowl and return to the fridge. Finally, measure out 1 cup of buttermilk and refrigerate that, too.

Your ingredients should all chill for at least 15 minutes. Meanwhile, go listen to Foreigner, then sprinkle flour on a work surface and have extra flour nearby for your hands, rolling pin (optional but handy), and biscuit cutter (optional but pretty). If you don't have a biscuit cutter, you can cut your biscuits into squares using a knife.

Now, make the dough! Remove your flour mixture from the freezer and add the cold butter chunks to it. Using your fingertips, quickly crumble the butter into the flour, rubbing the butter and flour between your fingers, until the mixture resembles coarse crumbs with pea-sized bits of butter. This method is the fastest, and the way I prefer to do it, but a pastry cutter also works. If you use your fingers like I do, be sure to do it quickly so the heat of your fingertips doesn't soften the butter too much. I have never had a problem using this method and the ingredients stay pretty cold. Next, pour in the buttermilk and stir lightly with a large spoon until the dough comes together in a ball.

Now it's time to knead the dough and cut the biscuits. Dump the dough out onto a floured work surface. With floured hands, lightly knead dough, folding just a few times until it barely comes together. The less kneading the better, as too much kneading will warm up your dough (bad!) and make it tough and chewy (double bad!). Knead the dough just enough to get it all together and happy, maybe 4 or 5 turns total. If you see little bits of butter, THAT'S AWESOME! Visible bits of butter = steam = layers = flaky = mmmmm = you get an A+.

Next, pat out your dough into a circle, or use a rolling pin to get it around 3/4 inch to 1 inch thick. Resist the temptation to roll the dough too thin! They will rise and puff up to some extent, but you still want to start with biscuits on the thick side so they puff up tall and can be split open. Dip your biscuit cutter into flour to prevent sticking, and cut biscuits without twisting the cutter. I use a scalloped biscuit cutter for pretty edges, but any biscuit cutter is fine. Press your cutter straight down and then wiggle it to get the rest of the dough off the cutter. You can also use a floured table knife to cut the biscuits into squares if you don't have a biscuit cutter. Just be sure to cut downward with short sawing motions so that you're not pulling and tearing at the dough.

(Square biscuits - they taste the same.)


Place the biscuits on an ungreased cookie sheet. After you've cut as many biscuits as you can, loosely form the leftover dough scraps together, barely kneading or pressing them into another flat circle, and cut more biscuits. Remember to keep dipping your cutter into more flour. This second set of biscuits might not look as pretty, but if you don't knead it too much they should still come out tender and tasty. Once you've formed all of your biscuits, you can brush the tops with melted butter or milk, if you feel like it. This step is optional, as it's more for looks than taste.


Now it's time to bake! Place the baking sheet in the middle of the oven and bake for 8-10 minutes until they start getting golden brown edges here and there. They might still look a little pale, but they will have golden brown bottoms and they will done. Pinky swear. Remove the biscuits from the oven, transfer them to a serving plate, serve warm with butter and honey (or whatever floats your particular boat) and enjoy!

Makes 10-14 biscuits.


Need to use up the rest of your buttermilk? Head over to my recipe for chicken and dumplings or give my chocolate buttermilk pie a try!

Converting US Cooking Measurements

Because I'm American, I understand the American system of cooking measurements. Things like 125 grams leave me with a blank look on my face and I have no idea how much that is, while I know exactly what 1 cup and 1 tablespoon look like. In a lot of cooking recipes, exact measurements don't matter, but I write them down as a guideline so someone doesn't use way too much or too little of something. In baking, however, exact measurements become a lot more important. If something is off in a baking recipe, it will totally mess up that loaf of bread or that cake you spent so long making! And that's always a kitchen tragedy.

So because some people looking at this blog are in other countries and do not use the American measuring system, I thought I would post a link here so you can convert my recipes into metric measurements. I want everyone who reads this blog to be able to try my recipes! Hopefully this link will be helpful, and if you'd like to find other conversion sites (there are tons), Google should point you in the right direction. I like this one because it has a built-in conversion calculator that converts US measurements to litres, grams, whatever. And, I'll try to remember to write both Fahrenheit and Celsius oven temperatures on all of my recipes. Hope this helps all of my international kitchen nerds!

Converting American cooking measurements!

(http://southernfood.about.com/library/info/blconv.htm)

Friday, November 22, 2013

Stuffed Pork Loin Roast


This is a recipe that's a hit with every meat-eater I serve it to. I take a large, wide pork loin and butterfly it, then I stuff it with bread, raisins, onions and parsley, and tie it up to roast. When it's finished, every slice has a center of savory, slightly sweet stuffing! Make sure to select a pork loin that is thick and wide, as there are also long and narrow ones, sometimes pre-marinated, that are much harder to stuff. You will need a thick, wide one in order to butterfly it.


Ingredients:

1 large, wide pork loin, about 3 to 4 pounds
4 slices of bread, wheat or white is fine
2 tablespoons butter
1 small sweet onion
1/4 cup raisins
1 bunch flat leaf Italian parsley
2 tablespoons olive oil
kosher salt 
pepper 
herbes de Provence (optional)
kitchen string 

Preheat oven to 375F or 190C. Dice onion and dried raisins into small pieces, and chop 1/4 cup worth of parsley leaves. In a large, nonstick pan, cook the onions, raisins, butter and parsley with a light sprinkling of salt and pepper.


Meanwhile, tear your bread into small pieces and place into a medium bowl. When the onions are translucent and the raisins have softened, put the onion mixture into the bowl of bread. Add 1/2 teaspoon salt and 1/4 teaspoon pepper, along with 2 tablespoons water. Toss the mixture together and set aside.

Using a large, sharp knife, slice into your pork loin from the side, butterflying it so that it opens like a book, with the meat thickness even on both sides.


Take your stuffing mixture and place it in the center of the pork loin, lightly packing it down to fit as much as possible.

(Don't worry, those veggies in back got cooked into more stuffing, I'd never serve raw veggies that had been in contact with raw meat!)

Using several pieces of string, close the pork loin "book" over the stuffing and tie simple knots to keep the roast closed and tight. Some stuffing may fall out, but you can push this back in on the sides.


Coat the roast in olive oil and lightly dust with salt, pepper and herbs. Place the meat onto a rack in a roasting pan. If you don't have a roasting rack, place the meat on top of several celery stalks to create a makeshift rack. If you have a probe thermometer, insert the probe into the thickest part of the meat (not stuffing) and set the temperature to 145 degrees, then begin roasting in the oven. If you don't have a probe, roast your pork loin for 1 hour and then check with a meat thermometer, making sure the meat comes to 145 degrees.

Allow the roast to rest for 10 minutes, and remove the string before slicing. Resting will allow the temperature of the roast to rise to between 150 and 155 degrees, which will give you juicy, medium-cooked pork. Your meat should be perfectly cooked and not dry at all. Serve with cinnamon applesauce if desired, and enjoy!

Serves 4-6

Chocolate Buttermilk Pie


This is a chocolate pie with INTENSE chocolate flavor! The filling looks almost like a brownie, but while the top of the pie has a slight crust, the filling is actually wet, dense and creamy. It tastes almost like brownie batter, and the buttermilk adds a hint of tanginess that makes the flavor more robust. I should probably point out that I am the kind of person who prefers milk chocolate over dark chocolate, while my mom can't get enough deep chocolate flavor. I will readily admit that this pie was delicious, but almost borderline too chocolatey for me. However, my mother, Dr. Chocolate Fiend, ate every last bite of hers. So this is a pie for a definite chocolate person. I use instant coffee crystals to enhance the chocolate flavor, but that doesn't make it taste like coffee. No one will know it's in there, but they will know that it tastes amazing.


Ingredients:

1 9-inch pie crust, store-bought or home-made
1 1/2 sticks butter
1/3 cup cocoa powder
1/3 cup chocolate chips, milk or semi-sweet
1 teaspoon instant coffee crystals
1 1/2 cups sugar
4 large eggs
2 tablespoons unbleached all-purpose flour
1 cup buttermilk*
2 teaspoons vanilla extract
1/4 teaspoon salt


Preheat oven to 400F or 204C. Making sure not to stretch it, carefully lay the pie crust into a 9-inch pie pan, tucking in any overlapping edges. Line the inside of the pie crust with foil and fill with uncooked rice or beans or pie weights to keep the pie crust down. Bake for 11-12 minutes until lightly golden, then set aside. Lower the oven temperature to 350F or 177C.

*If you do not have buttermilk, combine 1 cup of milk with 1 teaspoon of vinegar and allow this mixture to sit for 5 minutes before use.

While the crust is baking, prepare your filling. In a medium saucepan, melt the butter over low heat. Add the cocoa powder, coffee crystals, and sugar; mixing well until totally combined. Microwave the chocolate chips for 1 minute or until soft, and add to the butter and cocoa mixture. In another bowl, beat the eggs well and add the flour, buttermilk, salt and vanilla. Whisk until well combined. Making sure the chocolate mixture is not hot, carefully beat the chocolate mixture into the buttermilk mixture. Pour the filling into your prepared crust, filling the pie about 1/2 or 2/3 of the way up. Discard any remaining chocolate filling. 


Bake the pie on a cookie sheet for 45 minutes. The center of the pie may jiggle slightly when it's done. Allow to cool for 15 minutes. Serve warm or chilled with vanilla whipped cream or ice cream... or both!


Have leftover buttermilk you want to use up? How about trying my chicken and dumplings or maybe my fluffy buttermilk biscuits!

Saturday, November 16, 2013

Guacamole!

Sometimes, we get a craving for guacamole, but the store-bought stuff doesn't cut it. With a little bit of time and effort, you can make yourself an amazing guacamole that will keep in the fridge for a few days if covered.


Ingredients:

4 ripe Haas avocados
1 or 2 limes
1 tomato
1 onion
1 jalapeño
1 garlic clove
small bunch of cilantro (coriander), optional
1/2 tsp cumin powder
1/2 tsp salt
hot sauce


Scoop the avocado from their skins and place into a bowl. Cover the avocado with the juice from the limes, both for flavor and to prevent browning. Mash the avocado with the back of a fork. Finely chop one half of the onion and one half of the tomato and add to the avocado mixture. Finely mince the garlic clove and one half of the jalapeño, making sure to remove the seeds and soft white flesh they are attached to. Add this to the bowl, along with the cumin and salt. Lastly, gather about 2 tablespoons worth of cilantro leaves and gather them tightly into a ball, then finely slice the dense herb ball until it appears julienned. Add the cilantro to the avocado mixture, along with about 6 dashes of the hot sauce, and stir to combine everything. Cover tightly and keep in the fridge up to one week. If you want to prevent browning from oxidation, be sure to press plastic wrap right down on the surface of the guacamole. However, this is only for aesthetics, and is therefore optional. Enjoy your guacamole, kitchen nerds!

Chicken and Dumplings


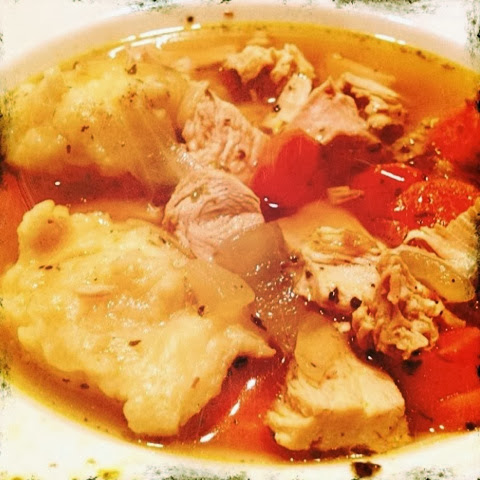
My mom came down with a cold yesterday, and with the weather finally cooling down after Southern California's record-setting freak heat wave this month (90 degrees in November is too much even for us), I thought it would be the perfect time to make chicken and dumplings.

For this recipe, I insist on using bone-in, skin-on chicken breasts and not boneless skinless. Boneless skinless chicken breasts are way too easy to overcook and have almost no flavor. They also won't give you a crucial ingredient, caramelized roast chicken drippings. This is what will give you a rich, dark soup broth. Also, boneless skinless chicken breasts are more expensive, and the skin and bones get tossed later anyway.

Now, there are different ways of making this dish. Some people make a hearty soup, which is the most common, while others make a creamy stew. Some people make dumplings that are flat, thick and cut into wide noodles, while others like their dumplings to be chewy little dough puffs. For my purposes, this will be a rich and delicious chicken soup with little buttermilk cloud dumplings that are dropped into the hot soup, then float to the top to steam and puff up. This simple recipe for deeply flavorful chicken soup can also be made with egg noodles if you're not the dumpling type and prefer chicken noodle soup. But, because I am the dumpling type, I'm going to present you with my recipe for chicken and dumpling soup! This recipe features the herb mixture known as herbes de Provence, which I highly recommend you keep on hand for this and other poultry dishes. It's divine! And as with all recipes, I recommend that you read the entire recipe before you get started.


Ingredients:

1 package of 4 bone-in, skin-on chicken breast halves
2 32oz cartons of your preferred chicken broth (64oz total)
3 large carrots
1 sweet onion
3 celery stalks
flat leaf Italian parsley (optional)
1 cup unbleached all-purpose flour
1 egg
1 cup buttermilk
1 tsp baking powder
1 tbsp butter
1 tbsp. herbes de Provence or a mixture of dried thyme, rosemary, and marjoram
kosher salt
black pepper
olive oil


Preheat your oven to 375F or 190C. Place chicken breast halves in a large roasting pan. Drizzle each chicken breast with about 1 tablespoon of olive oil, just enough to coat both sides of each breast. Lightly dust both sides of the chicken breasts with kosher salt and ground black pepper. You will want to sprinkle the seasonings from up high, because you will get a more even coating on the meat. Place the chicken breasts into the oven for 45-50 minutes, remove when skin is golden brown and blistered. Let chicken breasts rest. YOU MUST reserve the drippings from the roasting pan. If you do not reserve the drippings then I can't help you when it comes to having really robust flavor in your soup! The drippings are worth their weight in gold!


While your chicken cools, begin dicing your vegetables. Slice the carrots into bite-sized coins that will fit in a soup spoon, and dice your onion and celery into bite-sized cubes. In a large dutch oven or soup pot, sautee the onions, carrots and celery in 1 tablespoon of butter and 1 tablespoon of olive oil over medium heat. Remember to give the veggies a light dusting of kosher salt at this point, and stir every couple of minutes to prevent over-browning.


When the chicken breasts have cooled enough to touch them, peel the skin from the meat and remove the rib bones and any remaining breast bone from the breasts; discard the skin and bones. Using a large knife, cut your chicken breast meat into cubes that are between 1/2 inch and 1 inch size. Alternatively, you can tear the chicken into bite-sized pieces by hand. I prefer to cut it. You will notice by the end of cubing your 4 roasted chicken breasts that there will be A LOT of chicken meat! You could easily get away with only using the meat from 3 chicken breasts and bag your extra chicken to save for a salad another time, if you like.


Add 2 cups of water to the roasting pan, which should still have your golden brown drippings. Using a wooden spoon, scrape up as much of the drippings as you can, making sure the water becomes golden brown with all of that caramelized goodness. THIS is pure concentrated chicken flavor, and there really is no substitute for delivering knockout flavor to your soup! Reserve this liquid.


After about 10 minutes of cooking, your vegetables should be cooked, with the celery and onions taking on a more translucent look and the carrots becoming tender. Add your chicken meat to the pot right on top of the veggies, then add your reserved liquid from the roasting pan, which should be dark and cloudy. Add the broth, 1 1/2 teaspoons salt, 1/4 teaspoon pepper, 1/2 tablespoon herbes de Provence, and 3 tablespoons fresh chopped parsley. As with all dried herbs, be sure to rub the herbes de Provence between your hands to further pulverize the herbs until you can smell the essential oils. Taste the soup broth for salt and add more if needed. Bring to a gentle boil over medium-high heat. TIP: If you over-salt your soup (oh no!), you can, to a point, correct it with a little bit of brown sugar - but not too much, or it will be sweet, which you don't want. Ain't nobody got time for sweet chicken soup. Another trick to take some of the salt out of something is to add a peeled potato, then remove said potato before serving. But your best bet is to continually taste your food and add salt little by little so that you don't get in this predicament in the first place. 


While you're waiting for your soup to heat up, prepare the dumpling batter. In a medium bowl, combine the flour, 1 teaspoon salt, 1 teaspoon baking powder, 1/2 teaspoon herbes de Provence, and 1 tablespoon chopped fresh parsley. Then, crack the egg into a liquid measuring cup, then add enough buttermilk to come to the 1 cup line. You may notice a little yellow fleck here and there in the buttermilk, and that's okay, and normal, and I like to think of them as little high fives from Jesus. Beat the egg into the buttermilk, then add your wet mixture to your dry mixture. Stir with a spoon until combined; if not wet enough, add a couple of tablespoons of buttermilk. On the other hand, sometimes I need to add an extra tablespoon or two of flour, but start with the one cup first. The mixture should resemble a thick, fluffy batter that borders on dough, but too wet to actually knead. Get it? Confusing, I know. This is the kind of thing that just takes practice. 


When your soup is piping hot and bubbling and your dumpling batter is ready, begin dropping rounded teaspoonfuls of the dumpling batter into the soup. Use another teaspoon to scrape the sticky batter from the spoon. Each spoonful should float back to the top of the soup, and you can drop about 10 small spoonfuls of dumpling batter into the soup depending on the pot you use. If these drops of batter seem small, don't worry - they will at least DOUBLE in size when they're done! 


After you've dropped in all the dumplings you can fit, lower the heat to medium-low and cover the pot with its lid. Let the dumplings steam for 10 minutes, then turn off the heat and remove the lid. 


You should be presented with beautiful, fluffy pillows of dumpling goodness floating upon a rich, dark brown soup. Ladle dumplings and soup into bowls and serve immediately. Dumplings will eventually become slightly soggy after about 30 minutes of sitting in the soup, so save any leftover soup without the dumplings. Happy cooking, kitchen nerds, and let me know how it turns out!

Serves 6

Want to use the rest of your buttermilk? Check out my recipes for the best buttermilk biscuits or give my chocolate buttermilk pie a whirl!


It's About Time

Hey there, I’m Lauren. I’m finishing up my 20s in Southern California while I write, study, work and cook. I’ve been a slightly perfection-obsessed home cook since I started cooking at 9-years-old. This blog is for my friends or anyone who may be interested in the recipes I’ve found to be the most successful, which I've learned through a ton of trial and error over 20 years of being a kitchen nerd.

I geek out over learning and improving and perfecting popular dishes. I also have a thing for collecting cookbooks. I have the classics that everyone should have in their kitchen, and I have beautiful, huge cookbooks with specific dishes by region, photographed stunningly. But I don’t stop there… I collect all kinds of cookbooks. I like really old cookbooks and imagining what I would cook if I had the type of kitchen people had a hundred years ago. I love highly-specific cookbooks – I even have a Spam cookbook (from Hawaii of course), and a 50-year-old Campbell’s Soup Cookbook. I love magazines or cookbooks that feature old fad foods that aren't so popular anymore. Simply put, they are fascinating, and sometimes you can find an old dish that has gone out of style and find that it’s actually pretty great!

I’m a sucker for a brilliantly made All-American classic. New fusion cuisines can be awesome, but sometimes I just want the absolute best macaroni and cheese. Who doesn't love simple comfort food?

From classic breakfasts to holiday specialties, to simpler week night dishes, I’ve been happily serving up the best foods I’ve learned to cook with what I’ve had available to me in Southern California, and for a time, Hawaii. I love to use authentic recipes when I can, but I'm not afraid to admit when a new twist on something or an Americanized version is pretty darn good, too. Taste is king in my house. When I can, I cut down fat from certain dishes, but only if I can get away with it and the flavor and texture aren't compromised. There are certain cases where I never cut back on the fat because the final product just wouldn’t measure up. The same goes for convenience. If a newer technological method saves time and effort and doesn’t compromise the taste and texture of a dish, I’m all for it, and chances are I want to save time just as much as you do. But, if I know something is going to be unforgivably inferior just for the sake of shaving off a few minutes, I would rather take the effort to do it right the first time.

There have been many times when I’ve shared recipes with friends of mine who love cooking as much as I do. There have also been many times when friends have asked me how I make something, or ask how to do something they haven’t figured out yet. I’m going to try to break down each recipe so that both beginners and kitchen nerds can have a crack at it and fully understand how to make a dish. It’s way easier than some people think – it’s just food, don’t be scared to mess up! That’s how you get better.

On secret recipes – I’m not the kind of person to hoard a cooking secret! I have never understood the point of a secret recipe! Even to differentiate a recipe from others, there’s still the basic fact that people would rather have someone else who knows what they’re doing cook for them a lot of the time. But if someone wants to have a go at it, let them! It doesn’t detract from the awesome stuff I’m making. I am more than happy to share everything I know with anyone willing to listen and give it a try. So I won’t be hoarding any secret recipes or withholding one crucial ingredient. This is a full-disclosure cooking blog! If someone is helped by what I share then I’m happy to hear it.

Over the course of the fall season I’m going to be doing a lot of cooking, so I thought I would finally document my favorite recipes and my cooking processes. I’m new at this, so please bear with me while I try to make this blog look organized for easy searching. And for now, my photos are just from my iPhone! Thanks for reading my stuff, and happy cooking, kitchen nerds!